AWS Elastic Beanstalk Platform Provides a simplified approach to provision and scale EC2 Instances on the AWS Cloud. This is the AWS response for the Paas to deploy the codebase without worrying about the Infrastructure. Even the reverse Proxy, Load balancing and Auto Scaling can be configured automatically. If you want any customizations, you can customize them via extensions as per the standard procedures laid out by AWS and this is only for advance use cases and this will also end up with issues if this is not configured properly. In this post i have summarized all my learnings on the EB Environment which will be searchlight for people who struggle with this service.
Beanstalk Platforms
AWS Beanstalk Provides options to choose platform based on the application language. This includes Python, Java, NodeJS , dotNet etc. Each of these Platform provides version which eventually needs to be upgraded as and when AWS deprecates a version. Example, At the time of writing this, NodeJS 8, 10 are deprecated and NodeJS 12 and 14 are currently supported in the AWS Platform.
AWS Linux Generation
All the EC2 Instances by default are using the AWS Linux a modified Linux Distro for all AWS EC2 Instances/Service. Even the Lambda uses the same Linux distro for executing the functions. Recently AWS Upgraded the Generation to AWS Linux 2 and all the Preceding are Deprecated. Customizations for the beanstalk environment is not exactly same for these 2 generations. It slightly varies on how the scripts are executed while deployment.
Beanstalk Customization :
Before working on the Beanstalk Customization, One should understand how AWS handles the deployment. When a new deployment is Initiated, the source code is pushed to a deployment folder in S3 bucket and it uses that as a base whenever a new instances are launched. Then the code is extracted to a temporary folder called staging.
/var/app/staging/
In case of NodeJs platform all the app dependecies are downloaded via npm and app ready for bootstrapping. If everything goes well, the code is pushed to final folder named /var/app/current. On AWS Linux 2, a separate user account (webapp) process will be used to start the app. On the Previous generations, nodejs account app is used to start the app. You can check which account is used to start the app by using following
ps aux | grep node

# account webapp : AWS Linux 2
# account nodejs : Previous Generation of AWS Linux
From here the npm start script is called by default and the application starts. Here a sample package.json.
package.json

"scripts":{
	"start":"node app.js",
	"start-bg":"pm2-runtime app.js"
}
If you want to customize the default start command, you need to overide using the .ebextensions. See below for details.
God Mode for EB via Custom Scripts (.ebextensions)
Through custom scripts placed inside a (.ebextensions) in the root of your package, one have a full control over the app deployment process starting from building the app to the deployment stages. It also supports to change the default reverse proxy server from NGINX to any custom server like apache (httpd).
AWS Linux 2 stopped supporting few scripts via .ebextensions and they introduced one more folder called .platforms. This way any platform related changes can be dropped in this folder path and that will be copied over to the target environment.
Sample File Structure
├── app
│   ├── app.js
│   ├── package.json
│── .platform
│   ├── nginx
│── .ebextensions
│   ├── 00launch.config
└── yarn.lock
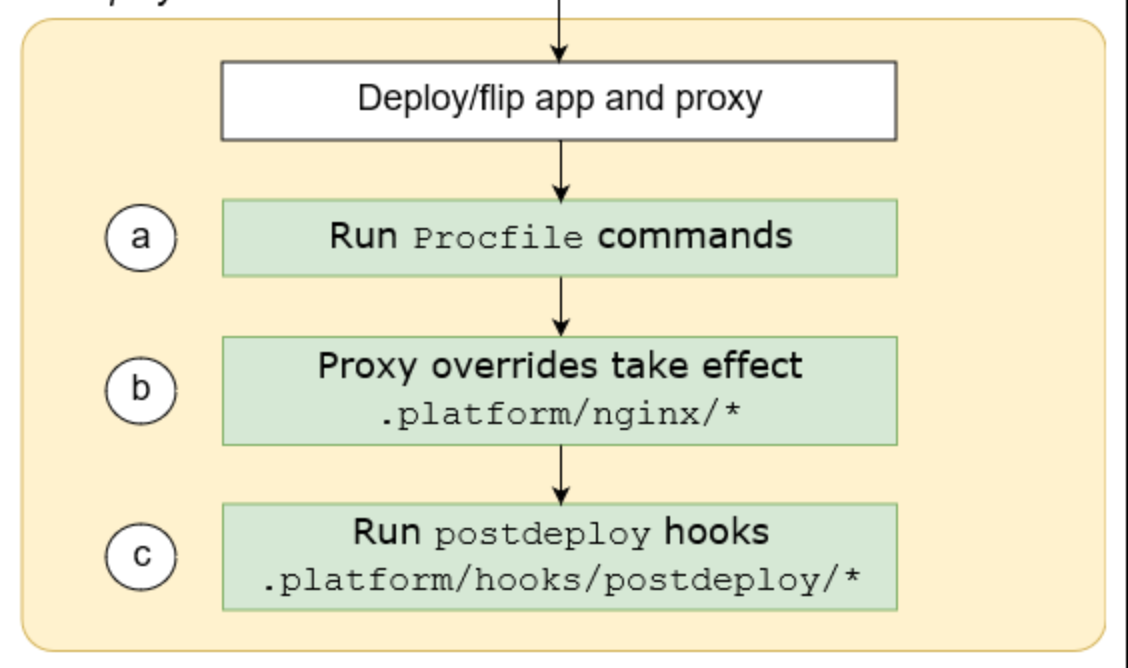
Here the diagram which is given in aws doc on how these scripts will be overrided and executed.
Customizing Builds
Most of time we may just create a build locally or using a CI and create a bundle of the artefacts and it can be uploaded to beanstalk as a compressed file. But in some scenarios, we may need to run some scripts or build the code on the fly. This type of customizations can be done using the hooks extensions provided by AWS. Hooks are special scripts which can be invoked by the AWS EB platform at various stages like predeployment hook, post deployment hook etc. This is more useful in case if you want to change the default behaviour of the paltform. Eg, EB uses npm install for the nodejs to install the code dependencies. If you wnat to override this with yarn, then create a separate hook script and add the commands to install and yarn and run yarn install in the code folder.
Customizing Reverse Proxy
Exposing a application through a reverse proxy has become the defacto standard. AWS EB uses NGINX as the default reverse proxy. Once can opt for Apache as well and can be customized using the proxy preferences. Infact we can even replace the entire configuration and add custom locations and further customize the upload size limit and other http related settings. In the previous generation we can simply use a script to create those files via .ebextensions. For the new Linux 2, AWS expects to create a separate folder .platform and keep those configuration files there.
LoadBalancer to Single Instance Customization
You may not always need a LoadBalancer for your application due to the target user count. Earlier Its possible to make the minimum count to even 0. But in the recent times, its hard to apply these settings. By default EB attaches a Load Balancer when you try to create a new environment from cli. I recommend to go with the Load balancer for a mission critical apps which needs to be up and server based on demands. Apart from the Auto Scaling, the Load Balancer Settings provides a interface to configure the HTTP Endpoints (80,443). Also, you can easily attach a AWS Certificate (free from AWS, but you cannot use them externally) to this 443 Listener and the site can be powered with valid SSL in few minutes once the domain name is verified.
If you initially created your environment with Single Instance then it’s not a big deal. If you started with a Load Balancer and you want to move to a single Instance, you willl end up without any meaningful errors from AWS Console. You can’t simple flip the button from Load Balancer to Single Instance.
Steps to Change from LB to Single Instance
- Change the Rolling Update to Time Based. Click Apply
- Change the Rolling Update Setting as Disabled and Click Apply
- Now Change the Load Balanced to Single Instance.
Changing to Single Instance takes some time as EB assigns a PUBLIC EIP and detaches the Instance and remove the original LB. It will take 5 to 10 minutes. Then you can access the Instance using the assigned EB Url or you can open using the eb open command.
OK. Now after changing to Single Instance, how to enable the SSL ?. Amazon doesn’t provide option to configure the ACM Certificates for the Single Instance. We may need to add some additional scripts via .ebextensions to attact custom SSL certs which you received from the CA. ALternatively we can use the LetsEncrypt to Issue a certificate and renew them automatically using a CRON. Please see below.
Customizing SSL Certs : LetsEncrypt
Mostly SSL Customization are needed only if you are going with the Single Instance on the EB. Otherwise ACM should able to help us to attach the Certs directly via Listener settings.
Here the steps and snippet to configure the SSL using LetsEncrypt
Steps :
- Enable the 443 Port on the EC2 Instance. Its disabled by default on Single Instance
- Install the necessary Packages for the ACME CertBot
- Request Certificate via script
- Create a CronJob to renew the certificate (safer side we can do every week)
Please set the environment variable DOMAIN_NAME and EMAIl_ID, that will be used in the script. The script will be executed by beanstalk everytime at the time of predeployment.
#.ebextensions/ssl.config
---
Resources:
  sslSecurityGroupIngress:
    Properties:
      CidrIp: 0.0.0.0/0
      FromPort: 443
      GroupId:
        ? "Fn::GetAtt"
        :
          - AWSEBSecurityGroup
          - GroupId
      IpProtocol: tcp
      ToPort: 443
    Type: "AWS::EC2::SecurityGroupIngress"

files:
  /etc/cron.d/certbot_renew:
    content: "@weekly root certbot renew\n"
    group: root
    mode: "000644"
    owner: root

container_commands:
  10_downloadepel:
    command: "sudo wget -r --no-parent -A 'epel-release-*.rpm' https://dl.fedoraproject.org/pub/epel/7/x86_64/Packages/e/"
  20_installepel:
    command: "sudo rpm -Uvh dl.fedoraproject.org/pub/epel/7/x86_64/Packages/e/epel-release-*.rpm --force"
  30_enableepl:
    command: "sudo yum-config-manager --enable epel*"
  40_installcertbot:
    command: "sudo yum install -y certbot"
  50_getcert:
    command: "sudo certbot certonly --debug --non-interactive --email ${EMAIL_ID} --agree-tos --standalone --domains ${DOMAIN_NAME} --keep-until-expiring --pre-hook \"sudo service nginx stop\" --post-hook \"sudo service nginx start\""
  60_link:
    command: "ln -sf /etc/letsencrypt/live/${DOMAIN_LINK} /etc/letsencrypt/live/ebcert"
  70_restartnginx:
    command: "service nginx start"
Troubleshooting Tips
1. Login to EC2 via SSH
# Ensure the SSH is enabled while creating the environment.
# The key used while creating environment should be used for SSH. Ensure the pem key exists in your local ~/.ssh folder

eb ssh

# default it will login to ec2-user
# Use sudo su to switch to root
# Use su <username> for switching to a specific account
2. Environment Variables
AWS Environment variables can only be access by your program at runtime. When you login to the shell and try to see the environment variables, it will not be shown. The following script can be used to verify the env variables for our app running in the EB.
values=$(/opt/elasticbeanstalk/bin/get-config environment)

# If you want to export this manually while troubleshooting manually.
for env in $(echo $values | jq -r "to_entries|map(\"\(.key)=\(.value|tostring)\")|.[]" ); do
    export $env
done
If you want to get/set env variables for your platform from your local cli without login then this will help.
# To print the environment variables
eb printenv

# To set a environment variable
eb setenv "DB_HOST=hostname.rds.com"
Alternatively, you can use the process.env to display the env variables from your app for trouble shootig purposes.
3. Setting Up Default Shell
If you want to troubleshoot a issue by logging into EB SSH you will be surprised that it will not allow you to access the shell prompt for the application it was started. As mentioned above, it uses nodejs account to start the app. When you switch user su nodejs, you will not get a prompt because it was disabled by default. You can enable them using the following.
Note : This is applicable only if you are using OLD Linux Generation. The New AWS Linux 2 runs on web app account and shell prompt is enabled by default.
# Grant the access to node command.
sudo su
vipw
#Replace
nodejs:\x:496:494::/tmp:/sbin/nologin
#to
nodejs:\x:496:494::/tmp:/bin/bash (":wq" to save changes)
# Note \x => x
# Now try switching to nodejs
sudo su nodejs
4. Accessing Node executable
PATH=$PATH:/opt/elasticbeanstalk/node-install/node-v12.22.3-linux-x64/bin/node
5. Accessing PM2 Executable
# cd to the app directory and you can use if you are using PM2 in your apps.
./node_modules/.bin/pm2 logs
Reference :
https://docs.aws.amazon.com/elasticbeanstalk/latest/dg/platforms-linux-extend.html